
When this contest was first announced, I though "Haha, I saw that challenge on Project Runway! But I don't think I can do something like that." And I tried to dismiss it from my mind, and focus on the brocade dress for Liz.
I was only partially successful, as I got the brocade dress and lining cut, and started working on the stay stitching, it turned out my cheapo universal needles caused runs in the brocade! :( Booo....
So I decided to work on the lining, but in the meantime, my mind kept returning to strange things I might be able to make clothes out of. I didn't want to buy anything for this project, so I was wondering around the house, randomly looking in cupboards. I had the standard white plastic trash bags, but no black ones. I considered those briefly, but dismissed them. Outside we have a willow tree, and the very pliable branches had me thinking about something small entirely out of plants, such as a woven hat or crown, but that would be too hard. I don't weave....
Under the sink though, I had 3 very sturdy paper bags, the kind with handles. An idea popped into my mind. We could make something like the children's book "The Papaer Bag Princess", only have it decorated, as if nature got all over her paper bag dress during her adventures.
Liz just LOVES to color and paint. If she could decorate a dress herself, and I could simply construct it, that would be so much fun! A great project for us to work on together.
Liz is always collecting pretty leaves, small flowers, etc on her walks outside. Paint some pretty bugs and flowers, add a little Elmers glue combined with her "collection", and voila; art! Or so I hoped.
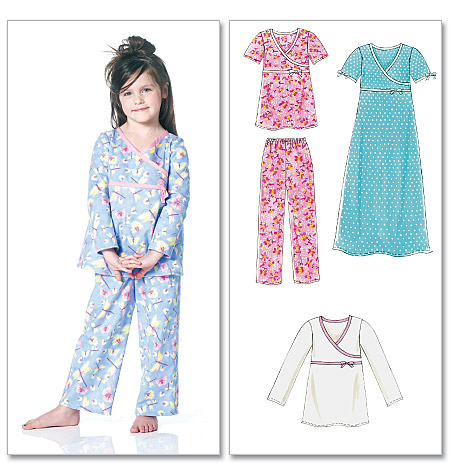
I went through my kids patterns over and over, but nothing was simple enough in my mind, nothing seemed like it would work well for a project like this. But about 1/2 of my kids patterns are PJ's, and it suddenly occurred to me I could use on of those might be perfect. Easy, simple, cute, I finally decided to use McCall's 6189.
Sleeveless, it is only 3 pattern pieces, 4 pieces cut (the bodice is mirrored).
On the 1st, I carefully cut open the paper bags. The pieces weren't wide enough to cut the front or back pieces on the fold, so I had to create CF and CB seams, to which I forgot to create a seam allowance....argh. I just had to make the side seams narrower to compensate.
This is where I discovered that sewing paper together is a lot like perforating it. :/
I ended using masking tape on the inside of each seam, to reinforce them and also to cover up the sharp edges that might cause a paper cut.
After I created the 4 main pieces, the next step was to draw something on them that Liz could paint in.
 Liz was super excited by this time, at the idea of helping to create her own dress. She helped select the motifs to decorate her dress: a couple of butterflies, a ladybug, a dragonfly, and a few flowers. I cut each one of these out, so I could trace them on the dress multiple times. She then spent about an hour a day for 3 days painting them in, and I helped out as well. She really enjoyed painting with her Crayola paints, though the pink is acrylic.
She's a very talented little painter, and good at staying inside the lines, and following patterns.
After we finished painting the dress pieces, she mentioned she wanted to put glitter glue on the dress. What a brilliant little girl! So we added glitter glue to parts of the dress, as well.

At this point, I sewed up the side seams, and then I realized how hard it was going to be to turn the dress (basically a stiff paper tube) right side out. Holy cow, I wrinkled the heck out of it, and at times I wasn't sure I was going to be able to do it intact, but I managed not to tear it!
Then I tried it on Liz...and it was impossible to get over her head. Grrr....
Ah, but easy fix came to me after a little thinking. I cut a 2.5" slit along the CB seam, and added a pretty little red button and a ribbon button loop closure. And, now she could get it over her head, hurray!

Our last task was to add our natural decorations. As I mentioned earlier, Liz loves to collect little things while she is outside, so we took a fun long walk in the park, collecting only fallen leaves that we liked. I told her we'd pick the flowers out of our own yard the day we took pictures of the dress, so they wouldn't wilt.
We glued already fallen leaves and some fallen lily petals all around the hemline of the dress, and randomly around the front piece of the dress as well.

Liz also has a little collection of small craft gems her grandpa got for her, and she selected a deep blue one with black veining to sit on the golden maple leaf we had found, as a sort of broach, where the bow on the pattern normally sits.


So, here it is, the "Paper Bag Princess" dress!

I went through my kids patterns over and over, but nothing was simple enough in my mind, nothing seemed like it would work well for a project like this. But about 1/2 of my kids patterns are PJ's, and it suddenly occurred to me I could use on of those might be perfect. Easy, simple, cute, I finally decided to use McCall's 6189.
Sleeveless, it is only 3 pattern pieces, 4 pieces cut (the bodice is mirrored).
On the 1st, I carefully cut open the paper bags. The pieces weren't wide enough to cut the front or back pieces on the fold, so I had to create CF and CB seams, to which I forgot to create a seam allowance....argh. I just had to make the side seams narrower to compensate.
This is where I discovered that sewing paper together is a lot like perforating it. :/
I ended using masking tape on the inside of each seam, to reinforce them and also to cover up the sharp edges that might cause a paper cut.
After I created the 4 main pieces, the next step was to draw something on them that Liz could paint in.
Liz was super excited by this time, at the idea of helping to create her own dress. She helped select the motifs to decorate her dress: a couple of butterflies, a ladybug, a dragonfly, and a few flowers. I cut each one of these out, so I could trace them on the dress multiple times. She then spent about an hour a day for 3 days painting them in, and I helped out as well. She really enjoyed painting with her Crayola paints, though the pink is acrylic.She's a very talented little painter, and good at staying inside the lines, and following patterns.
After we finished painting the dress pieces, she mentioned she wanted to put glitter glue on the dress. What a brilliant little girl! So we added glitter glue to parts of the dress, as well.
After everything was thoroughly dry, I went ahead and finished the basic dress construction. The contest committee agreed to allow in basic notions such as trim and bias tape, so I was able to safely and attractively cover the sharp edges around the neck and armholes. Luckily, I had a whole package of dark red double fold bias tape in my stash, and I thought it was a perfect color for this dress!
At this point, I sewed up the side seams, and then I realized how hard it was going to be to turn the dress (basically a stiff paper tube) right side out. Holy cow, I wrinkled the heck out of it, and at times I wasn't sure I was going to be able to do it intact, but I managed not to tear it!
Then I tried it on Liz...and it was impossible to get over her head. Grrr....
Ah, but easy fix came to me after a little thinking. I cut a 2.5" slit along the CB seam, and added a pretty little red button and a ribbon button loop closure. And, now she could get it over her head, hurray!
Our last task was to add our natural decorations. As I mentioned earlier, Liz loves to collect little things while she is outside, so we took a fun long walk in the park, collecting only fallen leaves that we liked. I told her we'd pick the flowers out of our own yard the day we took pictures of the dress, so they wouldn't wilt.
We glued already fallen leaves and some fallen lily petals all around the hemline of the dress, and randomly around the front piece of the dress as well.
Liz also has a little collection of small craft gems her grandpa got for her, and she selected a deep blue one with black veining to sit on the golden maple leaf we had found, as a sort of broach, where the bow on the pattern normally sits.
Lastly we added a few little fresh flowers. Just one pansy and a couple of tiny yellow buttercups.
So, here it is, the "Paper Bag Princess" dress!
I must say for a dress made of paper bags, Crayola paint, and fallen plant matter, I am very happy, it is pretty darn cute.
The best part was sharing the work with Liz, she really enjoyed being a part of making this dress, and is really proud of her work.
Now that we are done, she gets to keep it hanging in her room as wall art, a reminder of how SHE helped make her own dress. :)
She really wanted to spend time showing it off, and also enjoyed an excuse to wear her "Dorathy Gale" sparkly red shoes. :)
 Liz managed to move around in it pretty well! She certainly had fun making and wearing this dress.
Liz managed to move around in it pretty well! She certainly had fun making and wearing this dress.
Your Princess looks like she could slay any dragon! Love the dress!!!
ReplyDeleteAmazing!!!! I'm sure your contribution was wonderful, but Liz' paint job is GORGEOUS! A veritable artiste, indeed! I'm so out of the loop these days; wasn't even aware of this contest - now I need to go check it out.
ReplyDelete