Wednesday, June 29, 2011

One Pattern Many Looks Contest Plan

Sometimes I wish the ONE sewing class I could take would be on identifying types of fabric. I have a large storge bin full of decent fabrics now, and another smaller one with assorted sheets and scraps in it, and I can identify the proper name for about 10% of them. :( I'd really love to learn! Of course I can do burn tests, which can give me a rough estimate of the content of the fabric, but that doesn't help my truly identify it.

Well anyway, on with the story. So the next contest I'd like to participate in is One Pattern, Many Looks. The idea is to take one view of one pattern, and sew it up at least 2 times, each time making it distinctive and different just by using different fabric, trims, piping, and other embellishments.

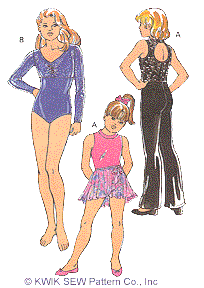
After much mind changing (something I do frequently when planning for my next project), I finally settled on McCall's 5388, View D (that is the view with the gathered sleeves).


I've read that this is a great pattern, but runs rather large, so I am going to plan ahead accordingly to make it amuch smaller size, and adjust the yoke to my measurements.

At any rate, I've had a wonderful time digging around in my stash, finding little treasures that were shoved to the back, or buried on the bottom.

My inspiration fabric for this pattern was this 60" wide, less than 1/2 yard cut drapey black boarder print. It's really gorgeous, but there isn't enough of it to make the entire top. After thinking about it for a bit, it occurs to me I can use some of this ivory eyelet fabric I have, from an antique duvet cover. I've been saving that fabric, but I have enough to spare a yoke and possibly sleeves. I wish the eyelet fabric showed up better in the photo.
I'm still debating weather to make the sleeves from the black or ivory, and it will likely depend on if I have enough of the black to do it.
Oh, I also think it will be kind of neat if I leave the edge raw, instead of hemming it. Something I'm considering, anyway.
Either way, I think this will be a beautiful top.


Next up I have some very lovely soft, silky silvery poly. Here is an instance where I wish I knew the name of the fabric. Anyway, it has a dreamy hand, and will end up being a more dressy top, though pretty plain. While reading one of the many reviews on this pattern, I saw that someone has said "The yoke is a veritable palate fore beading". Well, I haven't beaded in years, but I still have a few left over from my belly-dance costuming days.
I have 3 colors of beads left in my old box, gold, black, and this lovely silvery black peacock type. Perfect! Now I just have to come up with a good way to use the beads , a pretty design or layout that won't weigh the yoke down.

Lastly, I have this very interesting retro 30's golf print. I am not sure I'll use this for this pattern, this one is a big "maybe". I think the large print really might not suite this top, so I ay save this interesting fabric for another project.


Well, I'm very excited to get started on this later this week. My shoulder and neck are feeling better, not completely healed, but enough that I can move around some, now. I'll have to be careful, and not overdo it with my enthusiasm. But at least I can get started. :)

Tuesday, June 28, 2011

Dinosaurs duds

When Liz finished pre-school this year, the teacher gave me a very nice gift basket as a thank you for my volunteer work. I was kind of embarrassed to get this in front of a big crowd of parents, as I really wasn't expecting anything.
And the teacher and I had really gotten to know each other, and she was obviously paying attention to how much Liz loved dinosaurs, and how much I loved sewing. She gave me 2, 1 yard cuts of dinosaur prints fabric, a bag of dino buttons, and some plain hair clips to decorate myself.
Liz loved the fabric so much, she asked me to make her something right away, so I immediately picked out a pattern I thought would be suitable for the fabric, and for the upcoming warm weather. An OOP pattern, Simplicity 9650 (my PR review here), very cute looking child's jumper with lots of accessories (hat, doll, etc.).
I immediately noticed how the buttons and straps sat pretty high on the shoulders, but figured that wouldn't be a big issue. This was just for a summer play outfit. I considered, trying to modify the pattern, but lengthening the back straps would make the buttons sit low on the front straps, and I just couldn't work out a simple solution. So I decided to make it as is.

As this pattern was a gift, it was already cut to a size 4. I trimmed the widths down to size 3's, and left the lengths at 4. This is pretty typical sizing for Liz lately (thoughat the rate she is growing, I'm going to have to make the length a 5 soon, though width is staying a 3).

After getting the bodice and shorts sewn separately, A fitting showed both to be quite wide, even at a size 3. I took them in 1" on each side (2" total).

Basting the waist together showed me the crotch was too deep. Sadly, I misjudged here, and removed a bit too much (2"), and I should have only removed 1". I didn't realize that you need more room in the bottom and crotch on overalls/jumpers because there is no "give" at the waist when you bend over, as there is in a typical pair of pants.


So, the crotch was too tight when she bent over. I found away to let the crotch out 1/4", and move the buttons up 5/8", which gave her enough room to move comfortable, but no room to grow. Still, it will at least last through this summer, and she seems to really like it! :)


Liz and I received a number of compliments on how cute she was in that outfit (and how nice it was that I had made it) when we went out to the grocery store. I was pleased, but also concerned as this was the first time just about everyone we met recognized an outfit as "homemade".
I'm not terribly pleased with it. I also forgot to take into consideration the fact the that dino buttons are SUCH an odd shape, that Liz cannot undo them by herself, and so requires extra help going potty, and it can quickly become an emergency, as they take a moment even for me to undo.
The buttons sure are so cute though!


In the end, I shouldn't really label it a dud, as it is cute and wearable. I guess I had just hoped for more ?? Perhaps it is just that I've been sick for the last 2 weeks, so this wasn't my best work. Still, here it is.

I'm headed tot he Doc tomorrow to hopefully get some antibiotics to kick this Bronchitis int he bum. Every coughing fit seems to re-injure my neck, so I just can't wait to get better. I won't be doing much sewing for a few days at least, but I still have plans going round in my head!

I'm hoping to enter both the Sewing for Children's contest, and the One Pattern Many Looks contest next month. The Children's contest lasts 2 months, so I'll be doing the OPML first, I think. I've got a few options running around in my head. Since I have some thinking time, being sick and injured (haha!), I'll probably just spend time going through my little stash and trying to think up creative variations for each of my 2 patterns ideas.

I already know pretty much what I want to do for the Children's contest, but I'll go over that it my next post

I'd also like to throw a big thanks out there to Sheila, who has really facilitated my sewing habit lately. Her patterns have been great, and fun. And the fabric has been quite useful, so thanks ever so much!

Until next time, happy sewing everyone!


Saturday, June 25, 2011

Making a sewing project pretty on the inside AND the outside. Thoughts on garment finishing.

When I first started sewing, I had no knowledge of sewing, so I followed the pattern instructions exactly.
The vast majority of patterns (at least from the Big 4 pattern companies) do not include any finishing instructions at all. So of course, all of my first projects have raw seams inside, and look pretty "homemade" on close inspection.

My hems didn't look great either, with machine top-stitching.

As I didn't own an ironing board, I often didn't iron seams very carefully. Let me tell you, ironing on a towel on your coffee table is very discouraging, and back breaking. :(

I've since learned a lot of techniques that help a finished garment look more professional. I am well aware that I have a LOT more to learn, but I thought I'd share a few things that I've learned to make your project look great, inside and out.

Raw seams inside a garment are uuuuggggly. There are a number of way to finish seams so they look nice, and don't fray inside.
The most common modern technique is probably serging. Of course the problem is that you need a large, expensive piece of equipment specifically to do this. If you don't have a serger, there are still many ways to finish your seams nicely. Here is a nice, quick tutorial for most machine seam finishes.

The simplest ways are pinking the edges (need to purchase pinking shears, only works on tightly wove fabrics), and zig-zagging the edges, which is kind of like a poor woman's serger.

French seams are really only good for straight or mostly straight seams. On curved seams, mock french work well.


But there are some times a seam must be pressed open, so neither of these can be used. For those, I prefer to use a clean finish. this is simply turning the raw edge under 1/8" or 1/4" on each side of the raw seam and sewing close to the edge
There are some seam finishes that are great to use to add an interesting look outside your garment. One is bound seams. Basically, you take bias cut strips of fabric with the edges folded under, and bind raw edges that are showing on the outside of the item. I did this on ALL the seams with my Vintage 40's apron, here:


There are other types of seam finishes I've heard of but never tried, such as a Hong Kong Finish,which I've simply never had occasion to use, but h ope to try sometime in the future.

One of the coolest finishes I've learned is the ones you'll see on most pairs of jeans, called a Flat-Felled seam (tutorial).

The first time I used this was on a pair of shorts for my husband, James. It shows 2 rows of top-stitching on the outside, and looks really great on any item where there is other external top-stitching, such as patch pockets.

It also has the bonus of adding a lot of strength to a seam, as you are essentially sewing each seam 3 times. so less chance of split seams, and great for items that are going to get a lot of hard use!

Raw seams aren't the only thing that can make your project look homemade. Another is ironing, or more accurately pressing. It took me a while to learn, but most projects you will spend at least as much time, and often more time, at the ironing board than your sewing machine.

It's a lot of work, but it is so worth the extra effort! It is best to press most seams multiple times. First, when you originally sew the seam, you should lay it flat and iron it flat from both sides. This seams like a silly step, but it is crucial in getting clean, crisp lines on your finished project.

Next, press the seam open from the wrong side, then again from the right side. You may need to iron more depending on your chosen seam finish, as well. usually, you will be going back and forth from your machine to your ironing board as yo finish each seam or set of seams. Don't wait until everything is put together to try and iron, because often times you won't be able to properly reach or iron much of the garment then.

Here is a good example of an item that wasn't properly pressed during construction.


Also, I think it is a very nice touch to learn hand blind stitching for hems, sleeves, and neck facings, but I'll get into that later

It takes quite a lot of time to do the proper pressing, extra seam finishing, and hand stitching on a garment, but your finished product will show all the extra love, work, an attention you put into it!

Happy sewing everyone!

Wednesday, June 22, 2011

New SCA clothes

We haven't been to an SCA even in 2 years, and let me tell you, I miss going. This year, all our old friends have decided to have a get-together event, maybe at Acorn War.

I went and checked, and of course Liz has outgrown her old SCA clothes. Well, the wool overdress I made for her had a lot of extra hem, so I was able to make it long enough to use just for this year. By next year, I'll have to make a new overdress. But the under-dress was far too small. I had made up my own pattern making that, but didn't feel up to that this year.

Digging through my patterns, I found another one Sheila had sent to me. Simplicity 5382.


I felt the nightgown in this pattern could pass really well in the SCA, if it was lengthened and all the lace left off. Sure, it isn't totally period, but I felt it would work as basic garb, and be a simple project as well.

I also think the view of the top with the split sleeves and ribbon on the yoke will make a great tunic for her (also lengthened), something I plan to make soon.

At any rate, I had just enough plain white cotton left over from the duvet cover to make an under-dress.


The only issue I have with this pattern is that the back slit through the yoke is MUCH too long. to remedy this, I made 3 button loops instead of one, which closes the back much more effectively. I wish I had whiter buttons, but these pearls were the closest thing I had on hand.

This was also my first experience making my own button loops. I really had no idea how to make one, and the instructions in the pattern sort of assume you already know how.

I found a really great tutorial for making button loops, thought getting the size right is difficult. I think that comes with more practice.


Well, I really procrastinated with this project. I started it around the 5th, and finally finished it on the 21st. It's a very simple pattern, so my only excuse is that I have a case of bronchitis, and so I was getting some much needed rest.
Here is the finished gown, with a VERY deep hem (about 3") room for future growth. I think it looks very much like a choir robe! lol. But it does pass my close-enough-to-period test.
Hopefully, I won't have to make her another of these next year. For more details on the sewing process, here is the Pattern Review of it.


I had her try on the old wool overdress with it, which is about 1.5" short. I don't mind though, I think it looks fine this way. I will definitely have to make her a new one of these next year though, she's growing so fast!


Happily, it looks really good as an under-dress. I think the sleeves especially give it a period look, and make the whole thing work. It has lots of room for running, and twirling, and looks great in action! So, here is Liz's SCA garb for 2011. Next up....something to cover her fair head!

Monday, June 20, 2011

Dinosaurs for birthday presents

As Liz's 4th birthday approached, I knew we didn't have a lot of money to spend on gifts. We had already purchased her one large gift, and that left very little for anything else.

Liz just loves pillows, of all sort. And of course, her favorite thing in the world are dinosaurs. I had a few patterns from Sheila that were dinosaurs, so I started planning.
My Mother-in-Law had sent me a yard of beautiful dark blue fleece. I debated on using it, and finally decided that it would be perfect to make Butterick 3721 (OOP), a really cool pillow cover in various animal shapes (Dinosaur, cow, bear and lion). I got a small amount of lavender and white fleece for the contrasting parts for about $5 at Jo-anns, and got to work.

I have to say, this was one of the more frustrating projects I've done. Sewing through multiple layers of fleece, often with tightly stuffed horn or claw pushing against the foot, was no cake-walk. IT took a few tries to get the ruff on the head properly, but finally, I finished.


Her old standard sized pillow was a perfect fit.

The coolest thing about this pillow (besides the fact that it's a triceratops), is the detachable head! Yes, the head is attached with a wide strip a velcro, and is perfect for a little car or travel pillow.


Isn't it just adorable???!! Liz loved this gift on her birthday, and it was certainly worth all the trouble.


Next, I had a great OOP pattern, Simplicity 8302. It includes 2 sizes of dinosaur dolls with a variety of clothes options.
I had a hard time figuring out what fabric to use for the bodies. I had some green felt, but was unsure if it would be suitable and sturdy enough when stuffed tightly.
It worked ok, but in hindsight, I wish I had used something else. The felt stretched a lot, and it also pills, lints and I don't think will be long lasting.

Still the dolls turned out cute. I made a big daddy doll, and a little girl doll. I made no alterations to the small dolls clothing except to make the elastic longer. I made quite a few changes to the Daddy doll clothes, including adding straps and functioning buttons to the overalls, and also designing my own tam (which turned out a perfect fit!).


Turns out she doesn't much want to play with these, even though the arms and legs move. She likes them better with the clothes off (argh, what a lot of work!!), because dinosaurs don't wear clothes. lol.

I have put the clothing away, and plan to make the dolls more decor than play sometime soon, once I find a good place in her room to put them.

Saturday, June 18, 2011

Converting a dance costume pattern to swimsuit

Our little one is pretty skinny, and she get's cold in the swimming pool. I thought she'd be happier with something like a wetsuit, but we couldnt' afford to buy something like that. Fortunately, my friend Sheila had sent me this great dance costume pattern, Kwik Sew: 2678.
Also, here is my Pattern review for the swim suit.


I figured I could combine the long sleeved view B with the pants in View A (tapered at the ankle instead of flared) to make a 2 piece body suit for Liz.

Sheila had also sent me a large amount of lycra/nylon scraps she uses to make dance costumes. She told me the material is very suitable for swim suits as well. I found a sparkly pink and a neon pink that I thought would work well together.
There was barely enough of the sparkly pink to make the contrasting top, I even had to cut the arms in 2 pieces each, but I got it to work. I had enough remaining scraps to add some contrasting blocks to the bottom of the pants, so they looked more like a part of the outfit.

Sewing lycra for the first time was a bit of a challenge. I found that the sparkly pink fabric had less than the required 75% stretch called for in the pattern, so we couldn't get it on through the neckhole. I kept popping seems, too. I have since learned that this is as much due to using old thread as anything else.


However, I still needed some way to get it on her. Rather than make the neck larger, or add a snap to the back, I decided to make it snap at the crotch. This was a pretty simple little change, and I think it works great.

I had to size the original pattern down substantially. the smallest included in the pattern was a 4. Sheila gave me some tips on getting a suit like this to fit well. She said to use body measurements exactly, or possibly even with a little negative ease. I wanted a nice snug fit, so I went with 0.5" negative ease. The fit turned out great for the top!

The pants were a little trickier than I'd expected. As I mentioned earlier, I added a little sparkly pink color block to the bottom, so they matched the rest of the outfit better.
I also found I had to remove 1" from the crotch depth. I didn't make this adjustment until after I took pictures, so you'll notice the crotch area on the pants is a little baggy.
This seems to me to be a very common adjustment I need to make (on adult patterns as well), so I'm going to start checking crotch depth on the pattern pieces before cutting from now on.

Anyway, here is the finished outfit. Great fit, and she loves it. :D
Now we just have to go to the pool and test it out in the water!


Sunday, June 12, 2011

Crocheting sun hats

I've been taking a few days break from actually sewing. I had planned on making dad a shirt from a vintage pattern I picked up at the antique mall in Wheeler Or.

But it turns out I'm not quite comfortable enough with my skills yet to tackle that particular project. Vintage patterns are far more difficult than I had realized! The instructions for the cuffs alone had my head spinning.
Maybe for the holidays, I will give it a go.

So, in the meantime, I've been making some pretty little chrocheted sun hats for all the little girls I know. I found a really cute pattern called "Ruffle Brimmed Granny Style Skull Cap" on Crochetme.com
I started making one because I wanted to make a thank you gift for a friend of mine in Canada, who just had a new baby granddaughter. The hat turned out so cute, I decided to make one for Liz's friend Yana for her upcoming birthday, and one for Liz, too. I will probably also make one for Yana's little sister, Indie. If I find time, I may even make one for me. Do you think grown up girls would like these too? They sure are cute on kids!

I think the contrasting eyelash yarn around the brim is such a nice touch.
I also added some pretty little flowers. On the baby hat and Liz's, I made a 2 layer flower. Then I started wondering if that maybe wasn't a bit too much 3D on the side. On the dark purple hat for Yana, I made a single flower, and just added a single row of the eyelash yarn around the edge. This looks great, I think. I may have to remake the flowers on the other hats, but James says they look cute as is.

So, 2D or 3D flowers? Well, maybe some of each will be fun. :D

Next up, it turns out we may be attending an SCA event this summer!! Not sure which one yet, but I don't care. Any would be great. I am very excited, it's a been a while since we have attended one.
The SCA dress I made for Liz when she was 2 was easy to re-hem longer (since I gave it lots of room for her to grow!), and so it is only about 1" short, and will work fine. Butt she needs a new underdress. I wonder if I'll fit into any of my clothes very well now. I think I'll be fine, since most of it is also adjustable and/or loose fitting.
So now I'm hunting down a decent free pattern for a basic chemise I can size correctly for Liz. I'll post updates when I find something. :)

Saturday, June 11, 2011

Chinese Jackets for the Kung Fu lover in your life

With Fathers Day so close, I recently asked my husband what he'd like. He always wants a traditional Chinese Jacket, but I never had a good pattern to work from.
We found a great looking pattern, Folkwear 145. This company is supposed to do make great re-enactment and cultural clothing.
It's a great pattern overall, but has a few issues (inlcluding inner pocket placement), but mostly it's the frog closure design.
I ended up making traditional Chinese frog closures instead of following the pattern directions, which use modern buttons. I'm very pleased with the result, and so is James!!


I have entered it in the "knock off" contest on PR (review), though I do not expect to win. I think it is a pretty good knock off! Here is the jacket I was copying, next to James in the finished jacket.


One of the best things about the jacket is the lovely lining. It isn't a silky fabric as per usual, but an nice decorative cotton print. The interior facings also give it a very professional finish.

I do hope to make more of these. Another for James for Christmas, in nicer fabrics. I'll know how to fix the inner pockets, and also to lengthen the jacket by about 3" at the bottom.
I'd also like to make one for Liz before School starts next year, and possibly even one for myself sometime.

The amount of hand sewing is enormous. The collar twice, the sleeves, vents. The frogs take the longest though, creating them took me about 4 hours, and sewing them to the jacket took another 4 or more hours.
Still, the finished look is great. Very classic look!
James couldn't wait for Father's Day to wear it, so he got it early, and that's ok with me. He's wearing it practically every day, and he looks great in it!


Friday, June 10, 2011

Aprons make the perfect gifts!

Speaking of aprons, I thought I'd show the 5 I made last Christmas. One for Mom, one for Mom Pat, one for Brenna (sister-in-law), one for Grandpa Jim, and one for Mike (brother in law).

I used a different view from the vintage reprint Simpicity 3544 (PR review). I found the waistband to be odd, but it works.


This pretty plum print on ivory in the center was for my mother-in-law Pat. I used a vintage linen shower curtain for that apron, and I think it's my favorite. Check out the cool pockets and trim!


This orange and blue apron is for Brenna, my (almost) sister-in-law. Very vibrant colors, but I liked how they looked together.
I was worried the colors would be too extreme, but I really think they worked well. The crossover back with buttons makes this apron take a moment to put on, but the fit is very secure. I added extra buttonholes on the straps of all the aprons, so the recipients could adjust the size for best possible fit.


Finally, the blue apron for my mom. I love the little flower applique. Mom's not the girliest girl, but I think she appreciates little decorations like this.
I also think the contrasting red ruffle and bias binding on the pocket really make it pop.

So you can see that 3 aprons from the same pattern can look very different with fabric choices, and a variety of embellishments.


Next up, men's aprons!


My husband was kind enough to model McCall's 5366 (PR review). This is a water resistant rubber backed fabric perfect for outdoor grilling, for my Father in law.


The green checked cotton is underlined for durability. The shamrock applique is because hubby and his brother both have very high Irish pride. :)
I like this pattern enough that I know I'll make more, even for some of the ladies in the family since this is such a very practical apron!


Well, short post tonight, it's late. Had a very long day with my little one's last day of pre-school. Isn't she adorable in her "graduation" photo?
Grandparents came to watch the little show they put on, and everyone else is worn out and asleep.
My turn!

Wednesday, June 8, 2011

I won the Apron Sewing contest on PR!

PR Challenge: Aprons Large

Well, technically, I won the random drawing. But hey, I got a lot of votes, and I had recently made an awesome apron that I feel was a serious winner, so I feel great about it.
I get 5 Kwik Sew patterns, what a great prize! I'm very excited, and also having a hard time narrowing my list down to 5. Kwik Sew is probably my second favorite pattern company ever, so this is just a fabulous prize.

Here is the apron I made a few months ago, that I really feel could have won the votes if I had done it for the contest:

I know, I look super stuck up in that picture. :( Well, it shows the apron nicely. It is Simplicity 3544 (my Pattern Review here), a vintage reprint of 3 1940's and 1950's aprons.

And here is the apron I won the random drawing with:

This is Simplicity 2319, my Pattern Review. A really simple full body adjustable apron pattern. I spruced it up a bit with some appliques, ruffles, and contrasting fabrics. I have made this previously in the child size for Liz, and it's a great basic apron pattern.

I'm going to give this blue and red one to my mom for a late Mother's Day gift. I think the fit will be good, and they are colors she likes. She also wants one that is easier to put on than the one I made her last year. :)


So it has been a long time since I've posted anything, but in light of my many recent sewing projects, I thought I should start again.
I've decided to start sharing my sewing experiences, and other things as well. I don't have any followers yet, but maybe as I get better, there will be more things of interest here.
I'll try and post some of my recent projects int he next few days.