Thursday, September 29, 2011

Who doesn't love Jalie?

Well, I love Jalie, that's for sure! Although I only have 2 Jalie patterns, they are quickly becoming my favorite pattern company. Of course, I haven't tried many companies outside of the Big 4, such as Burda, or Style Arc, so this is just speaking from my limited experience.

I got this Jalie scarf top 2921 free as a thank you gift for managing the Vintage Pattern sewing contest on PatternReview.com. I had a few other projects lined up first, but I finally got around to sewing this up, twice!


I made a version for Liz first, sort of as a test. I'm glad I did, because I quickly discovered that the fabric I had planned on using did not have 2 way stretch, which means the neckline didn't stretch, so it barely fits over her head, and it feels really....cheap. I had to open the CF seam up more to make it fit, so that part looks a little mesed up.
I'm glad I didn't make one for myself out of this icky fabric.

As I'm a knit noob, it's a good thing this particular purchase from Jo-Anns wasn't worse. It was only 99c a yard for 2 yards, so not too big a loss.

I think the scarf neck top just looks just a little too grown-up on a kid her age, so I won't be making more for her until she's older, but this one is still pretty cute.


I had also purchased a 1-5/8 yard floral knit remnant at Jo-Anns that I planned to use for this top, and happily, this fabric was perfect. It's got the right amount of stretch, and also a very nice feel on the skin.
However, as I was hand hemming the bottom, Liz says to me "That's a pretty top you're making for grandma!". I asked her why she thought I was making it for grandma, and her answer: "It just looks like something grandma would wear."
Ah, kids say the darndest things. :)
Now I wonder if the print looks old-lady-ish. I personally liked it, but now I'm second guessing myself.

For the buckle, I scavenged a buckle off of an old belt, and though it is rectangular instead of a circle as the pattern calls for, I think it looks very nice.


One of the best things about this pattern is that the scarf can be done up in ALL the view options, just by leaving the small CF opening. It can even be tied in ways not shown, such as a faux necktie style. That makes it really versatile! I think I like the buckle best though. On such a busy fabric, the details of the scarf are getting lost, but on a plainer fabric, it would be really great to be able to do all 3.
I will certainly be making more of these! Great fit, great look, and versatility. What more can a sewist ask for?
Not going to be making more right this minute though, as I only have one decent knit left in my stash, and that one is planned for McCalls 5974 in the Think Pink contest.

Still, rock-on Jalie!

But next up, I want to make a scarecrow for Halloween, using McCall's 6413. I went through all my scraps with Liz, and she's helped me pick out the fabric to make it. Maybe we can work together and make it a sort of craft project she can help with!

Oh yeah, and I dyed my hair! Just a bit lighter (made some red pop out, totally unintentionally, I assure you).

Wednesday, September 21, 2011

Tinker Bell comes to our house!


Every time a baby laughs for the first time, a fairy is born. Or so the stories say.
Well, today I got my own little fairy, and oh boy is she cute!

Grandpa was kind enough to purchase the wings, after my EPIC failure trying to make them myself. I did alter the straps to be more comfortable and also less visible. The dress straps are also very invisible, and I'm really happy with how that all turned out.

I drafted this dress entirely on my own, my very first self drafted pattern! Although it was a lot of work, I learned so much, and the outcome is well worth all the trials and effort. About 3 weeks worth! :/ lol


When Liz decided she would like to be Tinker Bell for Halloween this year, I started shopping around for a good pattern, but found nothing I liked!
I was extremely disappointed in the look of Tinker Bell costumes and other fairy costumes by commercial pattern companies. None of them really look much like Tinker Bell. Instead, they look like generic green garden fairies. And ALL of them have a separate bodice and skirt piece, which Tink's dress does not.
I wanted a one piece dress, just like Tinker Bell's actual dress, but a little longer and more modest for age appropriateness.
I also wanted it to appear strapless like Tink's, so I made nude colored knit straps for the dress, and painted the shoulder elastic for the wings flesh toned. I think both of these things worked so well, they really blend in to her skin.

I also made the matching shoes, painting an old pair of Sketchers green, and made the white and silver pom-poms myself. I think the shoes are very signature Tinker Bell!


I did a lot of internet searching, and came across this costume, which was worn by an actress for the official Tinker Bell Movie premier. I decided to use this as a general guide for what I wanted to make. I didn't want to make the standard square handkerchief hems that are usually used to make the points on a fairy dress, I wanted actual points! The only way I could come up with to achieve this was to line the entire dress, and use the lining to hem the points. I think worked out great, for looks as well as for comfort and making a costume that is really well finished and durable.


Liz was so patient while I did multiple fittings on her over the last few weeks. She also did SO good today while I put up her hair. I had no idea how to make her hair go up into a bun on top of her head, I just sort of winged it (haha, pun intended). But it stayed there for hours! So that was a success.
I generally wouldn't approve of letting Liz wear make-up at her age, but for occasional dress up and for Halloween, it's fine. :)
So I let her wear a little bit of lipstick and I found some body glitter I haven't seen in years at the bottom of my old make-up bag. I put some on her cheeks and eyebrows. You can't really see in most of the pictures, but IRL it really adds a great touch to her fairy-ness, it's pixie dust!


I think all the details come together so well and that is why I'm so proud of this costume. From the pom-pommed green shoes, to the seemingly strapless, 8 pointed dress, the hair, the glitter, and the perfect wings from Grandpa, it really says "Tinker Bell". And Liz is sooo happy with it. I hope this will be a great play outfit, as well as a Halloween costume, for some time to come.

Thursday, September 15, 2011

Fairy feet

I finished making Tinker Bell shoes for Liz!


I had never made a pom-pom before, so these were an interesting learning experience. I got some very pretty white yarn with silver in it. I just made my own cardboard doughnut shapes, and an hour or so later (and a very cramped hand!!), viola! Tinker bell pom poms.

I got the shoes used at Goodwill, a perfect fit for a nice comfy Halloween experience. Ill fitting shoes are never good, even costume shoes!
They are just a basic white pair of sketchers. I mixed up some paint until I got a color that matches the dress fabric (I used an ice metalic green to keep it shiny, and also added sparkles) and applied 4 coats of paint. Sadly the sparkles in the paint and the silver in the yarn don't show well in my picture. here are the shoes before painting and pom-poms.


I've finally finished fitting the dress, but still need to work on the muslin (how to line it and hem the points).

I'm also ready to cut the wings, I've traced out a perfect shape, I think. I may do those first, and save the dress for last. I am still trying to work out if elastic around the body will be enough to hold the wings in place....I hope so, I don't want to use shoulder straps, it will kill all the work I've done to make a strapless looking Tinkerbell dress.

Wednesday, September 7, 2011

Sheets to shorts (and other things), a tale of upcycling

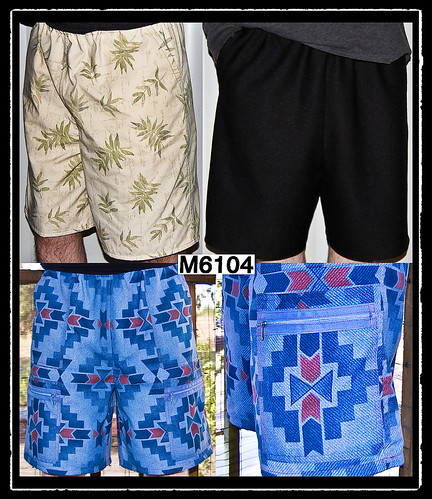
I've been working on another pair of McCall's 6104 for my husband. I've made him 4 pairs in the past, one of which he does not like (the material was like old lady pants type nylon), but he practically lives in the other 3 pairs! He requested another, and yet again, there was no suitable male appropriate patterned fabric in my stash, except for an interesting 80's art-deco top sheet. Somewhat ironically, the 2 pairs he loves best are made from bed linens, so I figured, go for it!

I was looking back through my projects, and I upcycle a LOT of sheets, pillowcases, duvet covers, shower curtains, and even vintage table-cloths. Used with the right patterns, these can make really great clothing, and other items as well!

I tend to buy sheets from thrift stores with the intention of using them for muslins, but often enough they turn into actual clothing. So, here is the newest addition to my husbands "comfy shorts" collection. I underlined them, and went with the slash pockets again, and flat felled seams at his request, as he prefers this in all his shorts and pants now. Yea, the fabric is kind of...80's and loud, but he already loves them.

So, I took a little stroll down memory lane, looking at many of the projects I've done with upcycled thrift store linens. The blue Navajo print shown below was a top sheet, and the leaf patterned Bermuda style shorts were 100% linen pillowcases. Those Bermuda ones are his absolute favorite pair!
My mother also recently requested a armchair remote control caddy for her birthday. I used some leftover sheets from my Renaissance gown, and made some back pockets for paper back books as well. This is a pretty simple pattern I created, but I think it will work well for her needs. Happy 67th birthday mom!

Next up on memory lane is my husbands renaissance shirt, McCalls 4862. This is a simple white cotton/ linen blend sheet, pretty heavy weight. I must say, this fabric is perfect for the rough, outdoor use it gets!

Sticking with my husbands projects, the PJ pants, Simplicity 4889, on the right started life as flannel holiday sheets. Yes, it's a bit odd, but PJ pants are allowed to be a bit more.....eccentric. :)

Next up is one of my favorite upcycling projects. I'm fairly certain that this lovely skirt from McCall's 5481 started life as a table cloth (it is also a linen blend). I had to trim the fabric off around the embroidered scallop, but it makes such a lovely skirt. Much prettier than as a table cloth!


This next was a plain old simple cotton top sheet. I started this dress (Simplicity 5189) as a muslin, but loved it so much, I just kept it. It's a great summer dress, and no one would ever guess it was once a sheet! Would they?
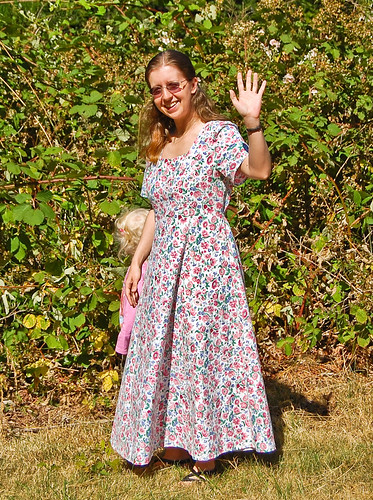
One of my very first major upcycling projects was my renaissance gown. I got this Cotton/linen queen sized sheet set with 2 pillowcases for $5!! I found out after I had finished making the gown that this sheet is a discontinued pattern by Ralph Lauren, called Guinevere. How perfectly ironic and fitting!
On e-bay, the pillowcases alone cost around $10 each, and a full sheet set is between $120 and $199. Wow, what luck! This is my favorite renaissance costume, and the underdress and all thelining are sheets as well.

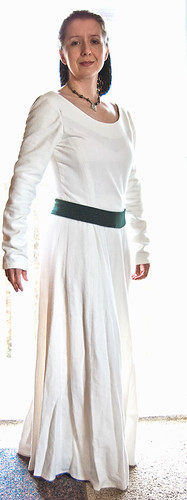


This gown is the same pattern as above, Butterick 4827, but without alterations. I love this pattern. This is certianly my go to pattern for renaissance costumes, as it is such a great fit, and very versatile! This one looks nothing like the one above, yet they are 90% the same pattern.


I've made quite a number of items for Liz with upcycled fabrics. Both of the PJ's below (McCall's 6189) are from flannel top sheets. Since I kept the fitted sheets and pillowcases for actual use on her bed, she can match her bedding. This is a little silly, but also kind of fun. :)

Below is a slightly large (fits her better now than it did back then) simple princess cut dress. The "fashion fabric" and lining are all sheets. I didn't yet know about underlining, which is why the seams show the way they do. This project (Simplicity 5520) was an early one for me, so it has issues.
Live and learn!
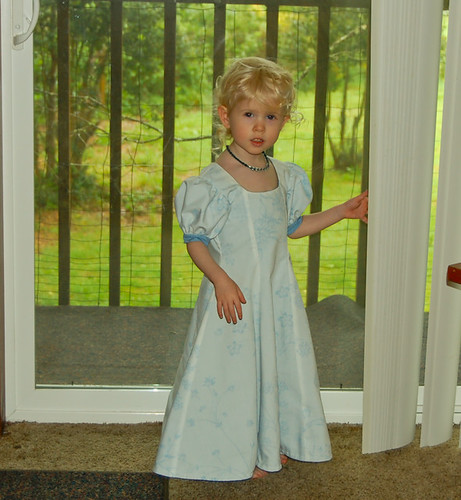
This may be my favorite creative use of a pillowcase so far, made using Simplicity 2377. I think the way I cut along the pattern and added the contrast bit in the middle is so cute! Sadly, she has outgrown this pretty little pillowcase dress, but when she did fit into it, she wore it often! I have more interesting and pretty pillowcases in my stash, just waiting for creativity to inspire more dresses for Liz.

Last holiday season, I made aprons for pretty much everyone in my family, men and women. These are all from Simplicity 3544 (a 50's retro pattern I adore, and have used 5 times now, with different options), I believe)The blue one on the left is quilting cotton, but the ivory and plumb floral in the center is a vintage 100% linen shower curtain. The orange on the far right was a vintage tablecloth. All of the contrasting fabrics are also upcycled linens.
The both made very lovely aprons, I think! I do hope the recipients enjoy them.

The hat and tote shown below are not my favorite projects ever (Butterick 5172), but are still very interesting. The asymmetrical hat brim was just weird though....
I made them as holiday gifts for my Aunt, who loves hats and totes, and also going to the beach. The striped fabric was a top sheet, and the lighthouses were the top edge of the same sheet.
Last but certainly not least, I used a cute flannel Daffy Duck pillowcase, stuffed lightly with batting, to make our sweet kitty a new cat bed. He still loves this thing, tough it's getting a bit worn out. Time for a new one this Christmas!!

I've made many other things with upcycled materials not shown here, from linings, underlinings, and shirts, to crafts and doll clothes. Sure, the fabric isn't new, and sometimes there is a compromise in what you can get, as far as colors and patterns, but it is extremely economical, great for the environment, not to mention a very satisfying feeling to turn an old, unwanted item into something "new" and usable.

Thursday, September 1, 2011

NW Balloon festival, and my little budding fashion designer

Last weekend was the Northwest Art and Air Festival in our new home town of Albany, Oregon. We attended the festivities the first evening, where they lit up the balloons at night, and we got to do a kids craft workshop and lots of other activities. It was a great fun!
The next morning, we woke early and walked down to the park to watch the beautiful hot air balloons launch. I'm afraid we live about 5 miles from the launch site, so my pictures weren't the clearest. But Liz and I both immensely enjoyed watching the sky fill with balloons. We stayed out at the park for a good 1/2 hour, just sitting and watching the sun rise with the colorful hot air balloons.

Although you can't see them all in this picture, as they spanned the entire southeastern sky at their peak, we saw almost 30 balloons in the air at one time.
On a completely unrelated topic, Liz got a silly little toy from Burger King. Mind you, we don't eat fast food often (it hardly existed where we used to live), but we do indulge about once a month. This was a pretty cute toy though, it comes with a dollform and 4 fabric squares, so kids can "design" their own clothes.

Liz immediately took to it, so I went through my scrap bag and cut out another dozen or so pieces of fabric for her to use. She's enjoying creating all sorts of looks by layering fabric at different angles, and playing with lots of colors and fabric types.
As you can see here, it's just a plastic doll form that you lay fabric on top of, then close the form to create the doll and her clothes.

There is a small slider at the bottom of the form, so you can make pants or a skirt. Depending on how you lay out the fabric, this allows you to make jumpsuits, PJ's, shirts, pants, skirts and dresses. Liz really enjoys this simple little toy. I can't believe we got it out of a fast food kids meal! I'm so glad I could really add too it by added a few fun fabric scraps, too. :)


I have not been sewing much lately, possibly due to the heat, but I hope to get back in the swing of things soon. My husband's shorts are cut, and the underlining basted on. I just need to get it together and get THEM together. :) I got side-tracked because my mother's birthday is coming up, and she requested I make her an armchair caddy to hold her TV guide and all of her (4!!) remotes. So I've been working on that...slowly. I have no pattern, just winging it. I hope it works out. Wish me luck! Happy sewing everyone. :)

Friday, August 19, 2011

Beauty and the brocade

Taking a little girl to a fabric store is a lot like taking her to a candy shop.
Last month, I took Liz out to Jo-anns to buy fabric for Simplicity 3588 (PR review here), and let her pick out a fabric herself. I took her to the brocade section where she oohed and ahhed over practically all of it, but immediately liked the turquoise with lavender flowers best.
We shopped around for a bit, just to make sure, but she was very set on that brocade, and it was a very flattering color for her, so I went with it. I was very lucky to get the amount I needed for the dress for only $6.50! Heck, the invisible zipper cost almost half that much....

After nearly a month of working on it (and oodles of hand sewing!), I finally finished. Sewing with brocade for the first time was quite an adventure!

So here she is, my little beauty, wearing her new brocade outfit. :D


While at Jo-anns, we also got the matching piping, buttons, and some silky cording to make my own frog closure. Making that was an adventure!
I've only used piping once before, and so I was pretty happy with the outcome of the collar, cross bodice, and home-made frog-closure.


There is also piping around the sleeve bands, but I found it fairly easy to put in if I basted it in place first. Actually, I found this fabric so slippery to work with, I hand basted the majority of the seams together before machine sewing.


This fabric really was a nightmare, but also a good learning experience. It was very difficult to cut (I do plan on getting special scissors for this type of fabric sometime in the future), and also hard to sew, or even to handle! I think I should have gotten a manicure before starting on this, because I felt like I caused little snags in the fabric almost every time I handled it.
I was very nervous about how the hem would look, so I did a very careful catch stitch. I am pretty proud of the finished result! There is almost no sign of the stitching from the right side.
I added about 1" or so to the skirt length and to the bodice, so Liz could have some growing room, since she is in an upward growth spurt.


I hope that this dress will serve her as her very nicest dress, for holidays and birthday parties for the next year. I really do think the color is perfect for her hair and complexion, and it also really brings out her eyes.

I took some of the small dress scraps and made 2 matching Kanzashi blooms, which I attached to some simple hair clips. I also used the remaining buttons for the Kanzashi centers, which is a little bit Matchy-matchy I know, but also really cute I think.
The hair clips are so pretty, I think she will get quite a lot of use out of them with other outfits as well.


I think the pigtails with the hair clips, along with the Asian style dress, gives her a little anime look. Since she is so fond of Ponyo, The Last Airbender, and other kid's anime, I think it's a great look for her. Here she is showing off a little Wushu that her dad has been teaching her, she looks so serious! But she had a lot of fun modeling her new outfit, and I had a lot of fun making it and photographing her. :)


Sunday, August 7, 2011

Doll clothes, everything in miniature

Last holiday season, I really wanted to make Liz some clothes for her dolls. She had 2 11-1/2" dolls, both of the Disney Princess variety, and that was the only clothing either doll had.

I decided to make each doll a nightgown and a day dress. I also wanted to make some accessories,if I could. My friend Sheila had recently sent me a number of doll patterns, and I selected Simplicity 9334 (my PR review here), an OOP pattern with lots of cute outfits.


I used satin lining fabric, and also old satin pillowcases to make the 2 nightgowns and the matching nightrobe. I was very lucky to find this beautiful white and gold lace trim for the white nightgown, so it has a wedding gown sort of look to it. My blue lace didn't have ribbon in it for the gown straps, so I had to sew some matching ribbon onto the lace myself.
I admit, I had a lot of fun posing the dolls in the dollhouse for the pictures, probably more fun than someone my age ought to have with Barbie dolls. Haha. :)


I thought the flounced dress was the cutest dress in the package, so I decided to do that one next. Wow, that one is harder to make than it looks! I took extra pains to make sure the fabric pattern lined up. Hemming the circle skirt flounces and sleeves was almost nightmarish, but totally worth it when finished.
I decided to try the coat, skirt, top in view 5 as well. Although it turned out really super nice looking, in hindsight I should have realized that a 3.5 year old wouldn't be very excited by a drab grey wool suit....
The red satin top is again a pillowcase, with the rosebud straps being some leftover trim from a apron I made for my MiL.
I also made a matching bag for each outfit. Black with silver sparkle quilting cotton (remnants of my bellydance costume), with a very pretty silver button and some trim I found that I thought was an awesomely perfect match for the handles. And yes, the pale pastel bag turned out cute, too. :)
And the best thing is they are actually function as bags!
My daughter LOVES these working bags; the dolls can go shopping, and carry little coins or items in the bags.


Oh, and here is the outfit with the wool coat, and the felt button belt as well.
I swear, her barbies are now better dressed than I am....

But as I said, I realized that the a-line skirt and coat might not be too exciting to my daughter, but the red top was super cute, so I thought I'd try another outfit with the same top.


I decided to try the "poodle skirt", view 6. As I didn't have a poodle applique (And didn't intend to make the matching accessories), I just used the rest of the rosebud trim so it matched the top's straps.

Again I used a wool remnant, so it is kind of stiff, not drapey. But that is not a bad thing, it gives it the look of the proper 50's undergarments...

To me, it looks like something right out of the Donna Reed Show, very 50's/early 60's.


The following spring, PR had a Look Alike contest, and I thought I'd make Liz a dress, and a matching doll dress as well.
I selected Simplicity 9838 (PR review) for the doll dress. I thought Liz's dress really resembled a German dirndle apron over a dress, and this pattern allowed me to try and replicate that.

Liz's dress is McCall's 6062 (PR review). It turns out to be the dress she requests to wear most often of all the dreses I've made her. It is very colorful, and comfortable. An excellent pattern if you can find enough contrasting/matching fabrics! lol
And because it has elastic in the neckline and a tie back, it has lots of growing room!


I do hope to make more doll clothing in the future. It is far more work than it appears. Everything has to be very precise on such tiny clothing, and the hemming alone is cringeworthy, but the results are well worth the effort. And I have to admit, it's kind quite a lot of fun, too.
I have 3 other unused doll clothing patterns. This coming holiday season, expect 4 or 5 new Barbie outfits!